Do you know that garages are one of the most disorganized parts of our homes? This is so because we tend to use them for storage, and this gives us the liberty to just dump items in there and leave them. This means no maintenance or organization. Now, we all know how remarkable it is to keep your garage organized and how frustrating it can get when you do not have an idea of where to put what. Most people will try to organize their garage but not succeed because they do not have the right tools or equipment. However, you can make a DIY Garage Shelf and organize it in the way you want.
So, with these 25 DIY Garage Shelf Plans, we hope you can start building your own shelves now. These are easy to make and will help you organize your things properly into categories, making finding them more accessible. The good thing about these is that they are adaptable enough, so whether your garage space is small or large, you can make a small or large DIY garage shelf, depending on your preference. You may need to buy the materials for some of these shelves, while for others, you may use the materials at home. Don't waste a minute trying to find a spot to store things—pick one of these shelf plans and get started today!
How To Build DIY Garage Storage Shelves

Building your garage storage shelves is an easy and cheap way to keep your garage clutter-free. Materials needed for this project: Storage totes, screws, wood glue, line laser, jigsaw, magnetic screw head, and a stud finder.
Steps:
1: Clean the garage
2: Sketch out the shelving design on paper (be sure to measure everything first)
3: Locate and mark the studs on the wall where you will be fastening the shelves
4: Install a 2×2 along the wall using a level. Screw it into place using screws.
5: Fasten 2×4s uprightly onto the 2×2 along the edge of the wall. These will form support beams for your shelves.
6: Fasten other pieces in place with screws and wood glue.
Easy DIY Garage Shelves
DIY Garage shelves are easy to add extra storage to your garage. Just follow these simple steps, and you’ll be adding additional storage space in no time. Here’s what you’ll need: a power drill, circular saw, wood, screws, tape measure, plywood, pencil, and speed square.
Lay down a large piece of foam insulation on the ground. Place a large piece of plywood on top. Measure and cut a 2×4” foot panel from the plywood with a circular saw. Repeat for other pieces. Assemble shelves as you wish! You can also include additional shelving by cutting shorter pieces of 2×4 to create “ledges” for storage bins or tools.
Congratulations! You are the proud owner of your own DIY garage shelves!
DIY Garage Storage Shelves
You don't need a ton of materials or a massive amount of time—just some patience and creativity. You'll also need a well-defined plan that will allow you to know the number of shelves you're making and the bracket you will need. Here's what you'll do:
1. Make the brackets (you can use wood or steel, depending on how sturdy you want your shelves to be).
2. Install the brackets at roughly equal intervals along your wall.
3. Place rectangular boards on top of the brackets, and voila! Your garage storage is done.
DIY Shelf For Garage

Feeling crafty? We sure are. This reclaimed door DIY garage shelf is an excellent way to upcycle something you may have sitting around and make it useful in a fantastic, modern way. First, wash off the dirt from the door and let it dry completely. Next, sand the door, and once it's smooth, paint it in your desired color. After the paint is dried, gather all of your metal pipes and assemble the layout to look good to you and fit on your wall.
Attach the pipe layout to your wall using a dado or L-bracket (or any other support you prefer), and then mount the door to the wall using a dado or L-bracket (or any other support you prefer). And there you have it! The perfect place to store your garage supplies—and display them simultaneously!
Easy DIY Garage Shelf With Plan

You've spent a lot of time cleaning up your garage lately, and you love how it's looking. But you know what would make it even better? A few shelves to hold some of your stuff. Fortunately, making a garage shelf is easier than you think. You don't have to be an expert woodworker or carpenter to build one—and we've got the free plans to prove it!
You need a few materials: a circular saw, Kreg rip cut, miter saw, impact driver, flip-top foot stand, wood pieces, wood screws, 12 gallon totes, and about half a day. Then you'll have shelves that will hold just about anything. This weekend is the perfect time to get started on your garage shelf project! We'll walk you through every step, from cutting the wood to assembling it. Click below for all of the details!
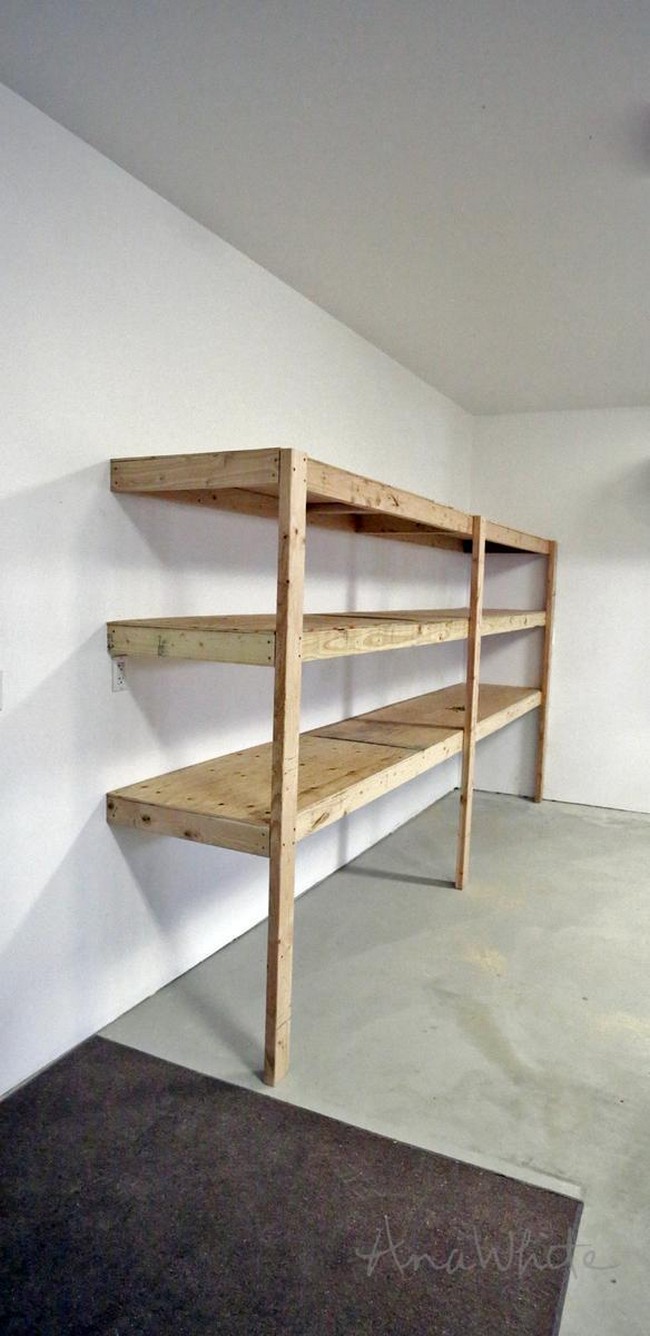
How To Build Garage Shelving
This is a garage shelving system you can build on a budget. First, find the studs on your wall and mark the height of where you want your shelves to go. Then screw in one 2x4 into a stud, add another two spaced out evenly, and then add a fourth to the other three. Add legs to both sides of the fourth 2x4, and then take it off its braces on the wall. Put it back up so that the leg holes are flush with the bottom of the braces, and screw in three more 2x4s that are spaced evenly across. Add legs to each end now, and then repeat until you have enough shelves for all of your stuff.
DIY Garage Storage Shelf
Are you looking to get more organized but don't have the budget for a professional organizer? We've got an easy DIY project to help you out. First, clear everything out of your garage and clean it up. Then, locate the studs in the wall with a stud finder and mark the spot on the wall where each one is located. Using your measurements, mark where you will mount the 2×2 pieces that will support your shelves. To determine how deep each shelf will be and how wide each shelf will be, you'll need to measure the space to ensure that all of your items can fit on them. Once you've got your measurements in place, cut all of your materials accordingly, and start constructing!
Best DIY Garage Shelf
These DIY garage shelves are easy to make and help you keep your space organized. The best part is, they only cost about $10 each! Here's how to craft them.
1. Measure your wall and mark out where the studs are. Take 2×4 pieces of wood and cut them to the length of your desired shelving.
2. Attach the 2×4 pieces to the studs at about 15 inches. These will serve as the support for your boards.
3. Attach pieces of rectangular boards to each of the 2×4 supports. These will be your shelves!
4. Once you have assembled the frame of your shelf, attach a front support piece at each end of the shelf and legs for stability.
Cheap DIY Garage Shelf

If you've got a garage, you probably have lots of junk. And there's no better way to organize that junk than with shelves. Here's how to make cheap DIY garage shelves using wood, wood screws, a circular saw, a power drill, measuring tape, a speed square, and wood glue. Start by cutting the pieces of wood needed for the project. Make sure you measure twice and cut once! Next up: make four shelving assemblies. The number of shelves will depend on your needs—you can use as many or as few as you want! After this, assemble the legs and attach the shelves to them. And voila! You're done! Enjoy your organized garage!
DIY Hanging Garage Shelves
Do you need to add more space to your garage but don't want the hassle of installation? Then our DIY hanging shelves are perfect for you. You need a drill, a miter saw wood pieces and drill bits, and a speed square. Get a long piece of 2×4" and mark at intervals, then pre-drill holes to marked areas. Attach three legs to this 2×4" and secure them with screws. After this, assemble other parts of the shelves, and you're good to go.
DIY Garage Shelves
Are your garage shelves cluttered, the unsightly mess you're ashamed to show off? Building custom shelving is easier than you might think! You can do this by locating studs, using a drill, and generally following directions! Clear all the clutter from your garage and clean it up. Then make a cutting list for the wood pieces. Once that's done, and your pieces are cut, locate the studs in your garage and install 2×4s on them. Now, attach other parts of the shelving to this frame. With just a few simple steps, you'll have durable and attractive shelves that will last for years!
DIY Garage Storage Shelves
DIY garage storage shelves are super easy to make, and the whole project can be done in a few hours. The best part is to customize them with your measurements to fit perfectly in your garage. You'll need some plywood, a 2×4, and some foam insulation. First, put some slats of foam insulation on the ground and lay a piece of plywood on top so the blade doesn't scratch it when you're cutting. Next, cut the 2×4 into two pieces for each shelf. Connect the two pieces using wood screws, then attach the plywood on top. That's it! Pretty easy, right? Now measure them out to fit whatever you need to store there!
How To Build Garage Storage Shelves
Building garage storage shelves is easy and affordable. You don't need to be a master carpenter to build these shelves, so let's get started! To build these garage storage shelves for your home, you'll need a tape measure, a circular saw, a drill/driver, some 2×4 boards, and half-inch OSB (oriented strand board). You'll also need some screws and glue. Your tools should be ready to use before you start building—if you're using a new saw blade, make sure it's sharpened before you start cutting. If you're using a new drill bit, make sure it's sharpened.
DIY Garage Storage
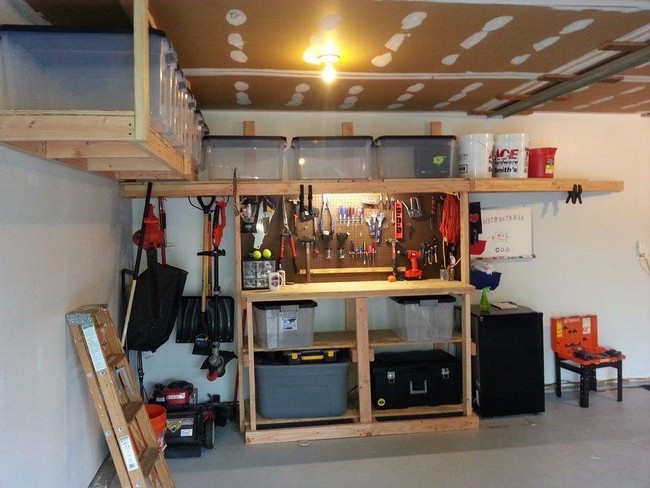
Building this storage shelf is a great way to use up old pieces of plywood and get your garage organized. To complete the project, you'll need a miter saw, power drill, hammer, nails, tape measure, and sheets of plywood. First, measure and cut the pieces of wood needed. Cut two pieces at 8 feet long; cut two pieces at 4 feet long, and cut four pieces at 6 feet long. Next, build the frame for the shelf. Your frame should look like a rectangle when you are done—it will be made up of three sides with an open front that faces out toward you. Now attach the frame to the wall. Finally, assemble the workbench on top of your new shelf by attaching the four legs to each corner of the frame. And voila! You're done!
DIY Garage Shelf For Tires
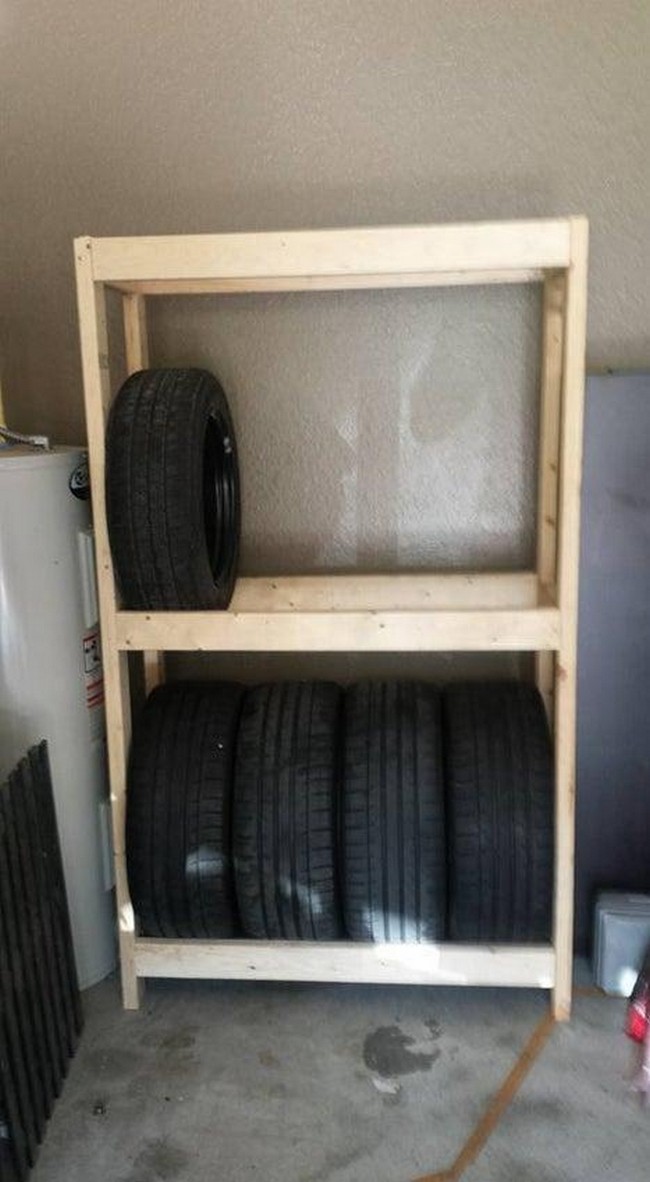
If you're looking to set up a tire rack in your garage, you want one that's easy to put together and simple to use. We've got good news for you: that's exactly what we're going to show you how to do! You can use some power tools in this project, but it isn't necessary. If you don't have a drill or saw, you can just as easily make this with hand tools. The only power tool we'll be using is a circular saw. This project will take about an hour and will not break the bank. So let's get started!
DIY Hanging Shelves For Garage
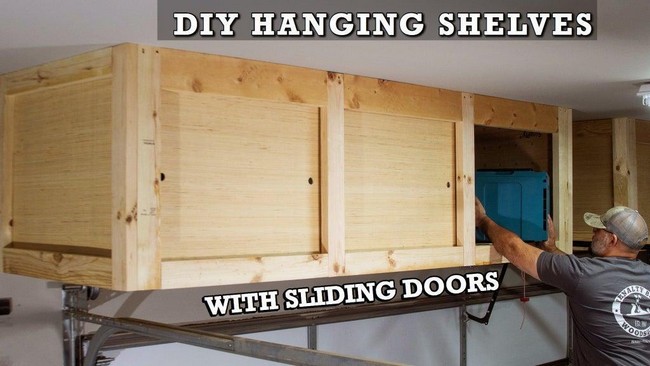
How about making your hanging shelves for your garage? It is easy if you have the right tools. All you need is some wooden boards, a miter saw, a track saw, a drill, a few clamps, sheets of plywood, a driver, and a Dewalt planer. First, cut out all the pieces needed for the project. Then measure and mark the wall where the board will be installed. Repeat this for the ceiling as well. Then install the boards and frame them with pieces of 2x4s.
How To Build Simple Garage Storage Shelves
So, you have tons of stuff to store but no space left in your garage? No problem! This is a straightforward and straightforward DIY project that doesn't require any special skills or tools. You'll need a circular saw, tape measure, a level, clamps, drill, screws, and a rafter square. You can also use a pocket hole jig and screws to assemble the box frame if you have one on hand. These shelves are mounted to the wall with 2x2s. The shelves can be mounted directly onto the studs or screwed into drywall anchors. This will depend on where your 2x4s are located, which you should measure before starting this project.
How To Build Garage Shelves
Building garage shelves is a simple and affordable way to expand your storage space, allowing you to free up some floor space while also increasing organization. These shelves are constructed with steel rails and a rubber mallet, making them easy enough for anyone to set up with no complicated tools. Here's how to do it:
1. Start by making the base. Make sure the holes in the rails line up, then install the side pieces and hit them slightly with a rubber mallet to hold them in place.
2. After this, install the support pieces across the base and place the shelf. Repeat this until you reach the maximum number of shelves you want.
3. Then make as many of these base units as you need. Be careful when assembling so that they're all level and even, as this can be tricky!
DIY Big Garage Shelf
If you're looking for a simple garage storage project, you've come to the right place. In this project, we'll show you how to build a perfect shelf for storing large items in your garage. To make this project, measure and cut all the pieces you need. Then take two long 2×4 pieces and join them by attaching cross braces with glue and screws. Once that is done, assemble all other shelf parts according to the diagram. And you're good to go!
DIY Strong Garage Shelf
This DIY project takes a few hours to complete and is relatively cheap. It will enable you to store all your stuff in the garage. All the materials required for this project include a circular saw, plywood sheets, wood sources, a small and big hammer drill, screws, and an impact driver. The dimension of the shelves is 2ft×8ft installed in a corner. To start cut all the pieces needed for the project, then assemble the shelving. After this, mount the shelving tongue wall and install the plywood.
DIY Garage Wall Shelving Unit

When building a garage wall shelving unit, you need a plan. Luckily, you can get one for free by clicking the link below. Once you have the plan in hand, you’ll know what materials and tools are needed so that you can gather up everything before you get started. Next, measure and cut the wood as called for in the plan. You’ll also need to assemble the frame using nails or screws. Finally, attach the shelves to the frame to finish your new garage wall shelving unit!
DIY Cheap Garage Storage Shelf
So, here we are today! The day you finish reading this article, you'll be ready to start making your very own garage shelves. It's easy and cheap. First things first: clear the garage and gather the materials and tools required. Then, start cutting the pieces one after another using a circular saw. Once the pieces are ready, assemble the brackets and install them on the wall with appropriate screws. Repeat this process until you have enough brackets in place to support your shelves. Next, screw two rectangular boards to each row of brackets with heavy-duty screws, and voilà! You have your shelves ready for storage!
DIY Garage Shelves With Plan

Need more storage? Who doesn't? This DIY garage shelf is a super-simple and inexpensive way to add some grave space to your garage—or wherever else you want to put it! It's built with 2x4s and OSB (oriented strand board) to keep costs as low as possible. You'll start by cutting all of your pieces to size and drilling pocket holes. Then you'll assemble the back of the shelf, install the cross braces, attach the other legs, and nail the OSB onto the shelves.
Once that's done, it's time to get out your paintbrush and polyurethane: finish off your DIY garage shelf with a coat of polyurethane in whatever color you want! There are many other ways you can customize this project: add a desk on top of a workstation or use plastic bins for extra storage. You could even make each shelf a different height to better fit whatever you need it for!
DIY $40 Garage Shelf Plan

Need a way to store your tools? We've got you covered! Our DIY garage shelf is a quick and easy way to add some storage to your space. You can even download our free plan for this project right here. Take an afternoon, measure and cut all the pieces, assemble the frame, and slide the plywood through it. Then secure it all with some screws, and voila! You've got yourself a beautiful new garage shelf that only cost $40!
DIY Garage Storage Shelves
This DIY garage storage shelf is a great way to organize your garage while saving some money. The materials required for this project include pieces of wood, a miter saw, a table saw, screws, a stud finder, a tape measure, and an OSB. Follow these instructions to build the shelves:
Measure and cut the pieces of wood to size using a table saw and miter saw. Use the table and miter saws to make cuts for the shelving assembly. Once you've finished cutting all the pieces to size, assemble them into a shelving unit. Measure the length of your shelf and cut an OSB board to fit that dimension. Slide it into place in the shelving unit and secure it with screws.